Can I clean my laptop keyboard with a vacuum cleaner?
Content:
You can vacuum the keyboard, and you need to do this as often as possible. Otherwise, you run the risk of becoming a user who cannot use the entire functionality of the computer because of the sticky keys. A simple home vacuum cleaner is suitable for cleaning, but if there is a special one with a thin nose on hand, then the work will move faster.

When is vacuum cleaning permissible?
You should immediately clarify that vacuuming is not suitable for all situations. For example, this household appliance will not save you from spilled juice or coffee, but it will perfectly cope with dust and small debris.
When can I vacuum my laptop keyboard?
- If the buttons began to stick or there is a clear "nedozhimanie".
- When dust is visible to the button device with the naked eye.
- In case of excessive heating of the case.
- After a long downtime.
In general, it is better to set your own timelines and strictly observe them. For example, clean every 2 months.

When is a complete disassembly necessary?
You should never rush, and if the keys on the computer began to be pressed hard, then the first thing to do is clean without disassembling - superficially. It’s not necessary to use only an ordinary vacuum cleaner: now there is a whole arsenal of brushes with bristles of different stiffness.
If surface cleaning did not help and the keys are still not pressed, you will have to completely disassemble the device.
Cleaning without disassembling the keyboard
A home vacuum cleaner is suitable for this procedure, but if you use the computer often, it is better to purchase a small and convenient device designed specifically for cleaning keyboards. Now even release USB-devices that work directly from the computer.
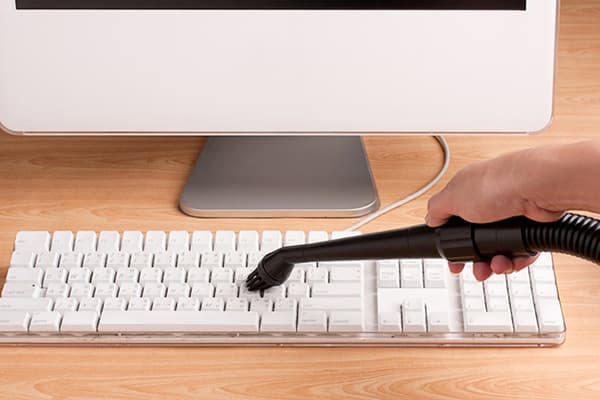
How to clean the keyboard without disassembling?
- Turn off the computer or battery if the product is stand-alone and works via bluetooth port.
- Tilt the keyboard slightly, turn on the vacuum cleaner to the suction mode and carefully walk through the rows of keys. It is desirable several times.
- Switch the vacuum cleaner to the blow mode and repeat the procedure, placing the device at a different angle. If your household appliance does not have a blow mode, then you can use a simple home hairdryer, setting the minimum temperature on it.
- At the final stage, the keys must be wiped with alcohol or a damp cloth. You can use only wipes that are released specifically for cleaning the surfaces of your computer. They do not contain aggressive substances.
If surface cleaning does not work, then consider another procedure - with a complete disassembly of the device.
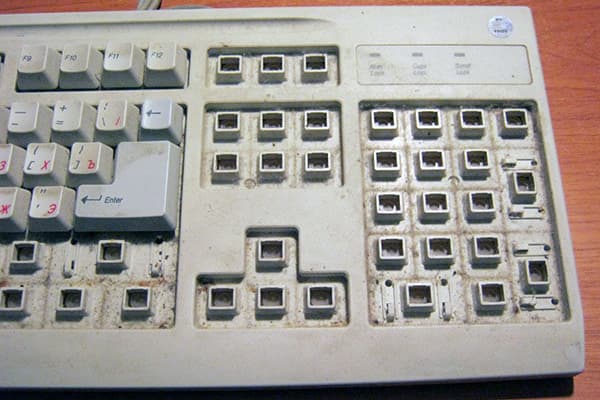
Complete disassembly of the keyboard and vacuuming
Arm yourself with a thin metal screwdriver with a flat end, you can begin to completely disassemble the push-button device:
- If you disassemble a laptop, first you need to remove the keyboard from its body. Usually it is fastened with plastic latches, but it is better to watch the training video on the Internet specifically for your model. In stationary models, everything is simpler: unscrew a few bolts on the rear panel - and access is open.
- Now it's time to get the device out of the laptop or carefully remove the buttons on the stationary version.
- Taking the device out, you can begin to remove the buttons. It is very convenient to do this with a flat thin screwdriver, prying each one on one side. Care must be taken, since the keyboard is connected to the motherboard by a thin cable.Damage it - and repair will fly into a pretty penny.
- The buttons are removed, and you can begin to vacuum all the elements. Only during cleaning should you hold all the removed parts well, otherwise you will then have to remove them from the dust bag. After the suction mode, you can turn on the purge and once again go through the disassembled device.
- The cleaning is over and you can proceed with the reassembly.
When starting to remove the buttons, do not forget to take a control photo of the layout, so as not to forget the correct sequence.
If the keys continue to stick, then the cause may be a malfunction of the spring mechanism or some kind of contact. Such repairs are hard to do on their own - the keyboard will have to be entrusted to specialists.