What are the oven cabinets for storing vegetables and can they be made independently?
Content:
A heating cabinet for storing vegetables is a real find for residents of apartment buildings. After all, they often do not have a separate cellar, so the problem arises of storing supplies for the winter - potatoes and other vegetables, as well as preservation. In fact, heating cabinets are large-volume thermoses that maintain a given temperature.
Types of thermal cabinets
According to the design features, two types of cellars are distinguished (thermal cabinets, thermal containers) - rigid and flexible. As the name implies, the hard ones are made of non-bending materials. They occupy the same place, regardless of whether anything is stored in them. Flexible heating cabinets can be folded at the end of the storage season. At the same time, significant space is freed up on the balcony.
In addition, heating cabinets differ in the following parameters:
- depending on the power supply - active, connected to the network, and passive, not consuming electricity;
- according to the material from which they are made - plastic, wooden, with a steel frame, from waterproof fabric and synthetic winterizer;
- by volume - from 95 to 100 liters.
Rigid thermal containers without power supply are convenient to use if they are installed in public places - in the porch or in the common vestibule. On an unglazed balcony or loggia, it is better to install a model with power so that vegetables do not freeze during winter frosts, and cans with conservation do not burst from the cold.
Flexible oven for storing vegetables on the balcony
Flexible heated containers for storing vegetables in appearance resemble a roomy backpack or bag. This is not surprising: they are sheathed with colorful waterproof material. This allows you to choose a heating cabinet not only on the basis of practical considerations, but also on aesthetic parameters. But the purely utilitarian characteristics of such a device will please those who store vegetables on the balcony.
Such a cabinet is equipped with a thermostat. Depending on the type of products inside, you can set the temperature from 0º C to 7º C. Electricity consumption varies with different models and depends on their volume. For example, a 95-liter cellar consumes 120 W / hour, and if 300 liters are placed in it, then it will consume more - 200 W / hour. As can be seen from the examples, the energy consumption of such ovens is comparable to the consumption of several light bulbs.
Cellars will preserve food in winter if the temperature outside is -40º C and not higher than + 5º C. The properties are provided by a three-layer fabric structure and an additional layer of insulation. Flexible heating cabinets are additionally equipped with fasteners - dowels and brackets, as well as a storage case in the summer. The lid opens easily - just unzip it.
Buy a cellar or do it yourself?
It’s easy to make a cabinet with your own hands. The simplest design is a cellar with a rigid passive frame, without power supply. For its construction does not require a lot of time and materials, so if you have free time, you can do this design yourself, and it will not be inferior in its characteristics to the purchased cellar.
Of course, if there is no time, desire to make something or skills in such work, then it is easier and faster to get a ready-made oven.Those who know how to handle a minimal set of tools, and are ready to try their hand, will be useful step-by-step instructions for making a heating cabinet on the balcony with your own hands.
Preparatory stage
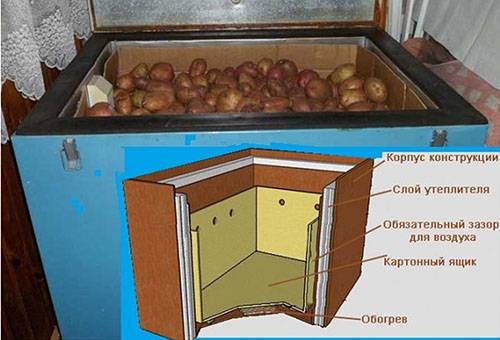
Before you start work, you need to decide what materials the cellar will be made of. Then stock up on the materials themselves and a suitable tool. For the frame, boards, chipboard, plastic panels, aluminum or steel profile are suitable. As a heater, you can use any heat-insulating material - mineral wool, polystyrene, batting, synthetic winterizer.
To properly make a cellar with your own hands, you need to present a general design. This is a container of any shape with double walls, between which is a layer of insulating material. Its height, width and depth must be done based on the free space on the balcony and the volume of products that will be stored there. But the total wall thickness should be at least 50 mm. The cover can be made removable or folding. If it is folding, then you need to prepare the loop.
Tip
If the frame walls are made of plastic panels or thin plywood, then for the role of insulation it is better to choose a plate insulation - polystyrene or basalt mineral wool. It will give extra rigidity.
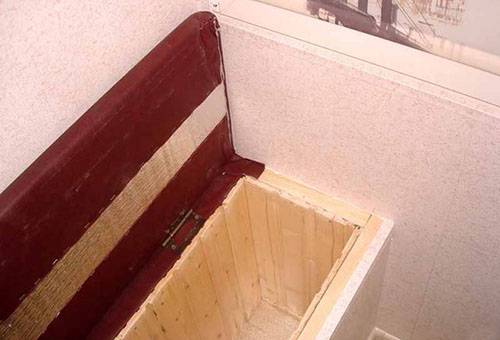
DIY cabinet for storing vegetables
We will consider the option of making a heating cabinet with our own hands from wooden beams 50 × 50 mm, chipboard sheets and foam plastic 50 mm thick. Step-by-step instruction
- Take a free space on the balcony and make a drawing of the cellar. At the same time, keep in mind that at too high a height it will be inconvenient to bend and get products. The optimal height is 50-60 mm.
- Treat the bars and particleboard with an antifungal composition.
- After complete drying, mark on the uneven bars in accordance with the drawing.
- Using a file on a tree, cut the bars according to the marking. You should get 4 vertical racks with a height along the height of the cellar and 12 horizontal bars. Four of them will be used for the cover.
- Knock down two frames from the bars - the frame of the box and the frame of the cover.
- Mark sheets of chipboard and cut 12 parts - two parts at the bottom, a cover, a front and a back wall. The rest will go to the end part. Please note that the parts for the inner lining must be 100 mm smaller.
- Sheathe the frame of the beams with sheets of chipboard (except for the cover).
- Using a wood saw with small teeth, cut from foam the details that will fit between the double walls. There should be six of them - on the bottom, cover, 2 sidewalls, front and back walls. Note that they must fit tightly into the frame.
- Insert the resulting parts between the walls of the box.
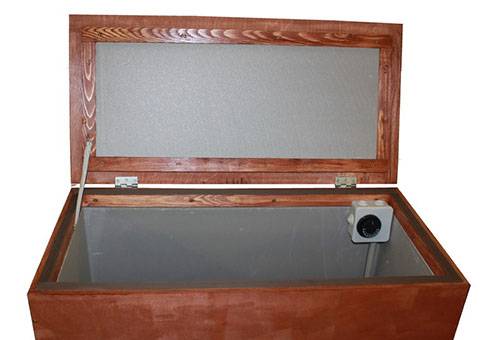
- Now make a cover - lay the foam between the boards and sheathe it with sheets of chipboard.
- Fasten the hinge cover to the box.
- Cover the structure with a protective layer - paint, varnish or film.
This completes the preparation of the cabinet itself. But in order to maintain the necessary microclimate in it, and the vegetables can breathe, you need to provide it with ventilation. How to do this, consider below.
Tip
You need to assemble the structure on the balcony, in the finished form it may not enter the door.
How to make the desired microclimate in the cellar?
The most ideal option for ventilating the cellar on the balcony is ventilation through the openings at the top. To make it convenient to adjust the degree of ventilation, a strap is mounted on top of the cover so that it can be easily moved. Such a fastening is easy to do if you nail into the lid cubes with grooves, and put a bar in them. Next, you need to drill holes with a diameter of 25-30 mm in the lid and on the bar. Now, moving the bar, you can adjust the degree of coincidence of the holes, and, accordingly, the intensity of ventilation.
If you insert a perforated tube with incandescent lamps fixed in such a thermobox, the passive cellar will turn into a full-fledged thermobox with heating.For this, in addition to a pipe with two or three incandescent lamps, you need to install a thermostat and make a hole for the wire in the box. You can use a thermostat from household appliances or buy a thermostat. A self-made cellar with heating will be a reliable storage for preservation and vegetables for the winter.